Saturday, September 24, 2011

Ah, The "Musical Fruit!"

Bean seeds to be planted for next year's bean crop

Many of the green beans that I planted in June and did not pick with the intention of saving them for next year's seed are just getting to the stage when they need to be picked, dried and stored. Beans are some of the easiest things to save seed from!  Simply leave the beans on the plant until the pods start to turn yellow and dry, then pick, shell, dry a little more and store them in an airtight container in a cool, dark place.  I've read that it's a good idea to place them in the freezer for a short time to kill any bugs that may be inside, but I never do and have never had a bug problem....knock on wood!

I think part of my fascination with beans is the fact that they can be so varied in color, shape and size.

Some of the beans I recently harvest for seed.  White bean is the pole bean "Helda".  Black bean is a bush bean called "Cherokee Wax", and the red bean is another bush variety, "Provider"

Getting the timing right on picking the bean pods intended for seed use can sometimes be tricky.  Our weather this year has been extremely wet which has resulted in some of the beans rotting, getting moldy, and sprouting in the pods!  I decided to pick many of the beans before the pods are completely dry in an attempt to avoid the mold/rot/sprout issue.  Hopefully that doesn't adversely affect the seed quality. (I seem to remember writing something similar about the popcorn I recently harvested!)

Helda beans with two seeds already sprouting in a still-green pod!

Helda seed sprouting....aw, look at those little roots...I'm assuming they're little roots since the leaf portion is still in the seed!

You know, maybe that Jack & The Beanstalk fairy tale isn't so far fetched...you know how the mother tosses the bean seeds out the window in despair?  And the next day there's a beanstalk growing up into the clouds?  And the seeds weren't even "planted" in the soil, yet they grew?  Well, perhaps my Helda beans are a relative of Jack's beanstalk, seeing how it's so anxious to grow and it's not even planted ;-)   Those bean stalks did grow pretty high!


Monday, September 19, 2011

Spuds + Floods = Duds

I planted 6 varieties of potatoes on June 16 of this year.  I like to plant potatoes a bit later than the average bear normally would because this way the Colorado potato beetles don't seem to be the astronomical  problem. that they typically can be.  That being said, I actually had more CPBs this year than I've ever had, for some reason.  Interesting.  I don't normally have issues with them.  

The six varieties of potatoes that I planted (and they were all from saved potatoes from last year) were "All Blue", "Buttercream",  "Yukon Gold", "Red Norland", "Red Gold", and a red-skinned white potato that was particularly tasty that I got from an organic foods co-op.  Once planted, the potatoes grew as they should, and eventually the foliage started to die back not too long ago which is a sure sign that the potatoes are mature and ready for harvest.

So, I set about digging my potatoes this past weekend....
But!  Two weeks ago we had major flooding here in Central Pennsylvania due to Hurricane Lee (later-turned-tropical-storm Lee).  We got 15 inches of rain in 2 days and the flooding was devastating.  Our own little house was spared the ravages of the flood only because we had 2 sump pumps running constantly in the basement for several days, and our stream crept closer to the house than I've ever seen:  11.5 feet away  from the front of the house.  The garden was under water for a spell and the potatoes, apparently, didn't like that one bit.

Reports from local potato farmers are of devastation to their crops.  A friend of mine said 50% of his potatoes were destroyed by the flood, which is what I calculated to be my loss to be.

What originally appeared to be good potatoes were later discovered to be rotting once a bit of pressure was put on the spud.

When I began digging my potatoes I was horrified to discovered one rotten potato after another.  I could imagine what the Irish potato famine victims must have been thinking as they discovered their crop ruined.  I would find what I thought were perfectly good potatoes, but upon lifting them from the earth found that their insides were liquefied, or mostly so.  The slightest pressure on the potato caused the release of a foamy white vile stench of a liquid.  Yuck!

When I started digging my All Blue potatoes, I was startled to find brilliant purple and blue "smears" in the earth where healthy potatoes once thrived.  The colors were so vibrant it makes me wonder how purple potatoes would do as a natural fibers dye.

Former "All Blue" potatoes

My potatoes are now all dug, and I have a very small crop to use as food.  The rest I shall set aside as seed potatoes for next year.  I'm keeping my fingers crossed that the chosen seed potatoes keep through the winter and don't spoil as I'm not certain that they're perfectly healthy just yet.  Time will tell.

Saturday, September 17, 2011

Popcorn!


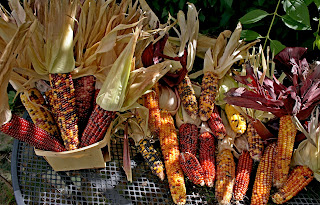
Some of the ears of Calico popcorn that I recently harvested

I've gardened for many, many years, but this is the first year I've grown popcorn.  Part of the reason I've not grown it before now is I just didn't have the room for it, OR sweet corn, but this year we created a new garden space which has opened up quite a bit of garden real estate for us.   My dad grows popcorn once in a while, and I remember evenings at home, helping to shell some popcorn (usually Strawberry Popcorn) so we could pop it.  He often had popcorn on the cob hanging decoratively on the fireplace in the living room, and whenever the mood for freshly-popped corn struck us, we'd grab an ear or two, shell it and pop it!

I had a spot in the garden where I'd planted some winter rye last fall, and that is where I decided to plant two varieties of popcorn: Calico, and Early Pink.

Calico, one of the two varieties of popcorn I planted this year

Calico popcorn seed

Earlier in the spring I cut the rye back but didn't till the area, so it looked something like a lawn. I wanted to experiment with planting directly into the un-tilled rye stubble figuring the cut rye would act something like a mulch.  So, I grabbed my hoe and went to work digging the necessary trenches for the seed.

Planting directly into the rye stubble

Once planted, I only had to wait 3 months before picking time, and that happens to be right now!


Why hello there, Mr. Calico Popcorn!

It's fun to shuck the ears of popcorn and see what color is waiting beneath the layers of husks.  The colors are intense and gorgeous!  No human could create colors so extraordinary!

Calico Popcorn


 The colors remind me of jellybeans!  I can almost smell jellybeans....

Early Pink Popcorn.  I think it crossed with the Calico...And these colors are stunning, too!


Another shot of the variety of colors of Calico popcorn 

A lot of the popcorn that I picked could have dried a bit longer on the stalk, however, we've had so much rain lately that some of the corn was beginning to mold.  I didn't want to take the chance that many more of the ears would succumb to mold, so I picked some before their time.  The husks were mostly dry, but not completely so...hope that doesn't make much (if any) difference in corn quality.

An ear of Calico popcorn that is beginning to mold

The following excerpt on growing/storing popcorn was taken from the Horticulture and Home Pest News:

"Popcorn is grown for its tasty, exploding seed. Heating the kernel converts the moisture inside the kernel to steam and turns the seed inside out. The quality of the end product depends on the conditions during growing, harvest, and storage.

Growing

Several different varieties are available to home gardeners. Be sure to select a variety that will mature in your area. Sow seed directly in the garden in spring in several short rows. This ensures good pollination. Thin as recommended on label directions. Do not plant sweet corn in the same garden with popcorn. The quality of the sweet corn will be reduced if it is cross-pollinated by popcorn.
Water, fertilize, and weed regularly. Any serious stress like water deficiency can greatly reduce yields and the quality of the popcorn.

Harvest

Allow the kernels to dry in the field as long as possible. When harvested, the kernels should be hard and the husks completely dry.
After harvest, remove the husks and place the ears in mesh bags and hang in a warm, dry, well-ventilated location. The ideal moisture content for popcorn is between 13 and 14%. Once or twice a week, shell a few kernels and try popping them. When the test kernels are popping well and tasting good, shell and store the rest of the kernels. If the popcorn is "chewy" or the popped kernels are jagged, it is too wet and needs to continue drying.

Storage

Store the kernels in sealed, airtight containers. If stored properly, popcorn should retain its popping quality for several years. Unshelled corn should be stored at temperatures near 32F and high relative humidity. The storage location should also be rodent proof.
If stored popcorn fails to pop, it may be too dry. Add 1 tablespoon of water to a quart of popcorn. Cover and shake at frequent intervals until the popcorn has absorbed the water. After 3 or 4 days, test pop a few kernels to see if it is ready. Add more water and repeat the process until the popcorn pops well."

Monday, September 5, 2011

After The Rain

Rain fell overnight and early this morning.  I love to wander through the gardens here at Cairnwood Cottage in the morning after a rain...
This morning glory on the arbor at the entrance to our patio seems to be glowing from the inside out.  Viewed from below.

Morning glory and spider's web on the arbor at the entrance to our patio this morning

Close-up of the arbor/spider web morning glory

Little green cherry tomato basking in the morning rain

Gladiolus 

Sunday, September 4, 2011

Speaking of Beans....


A few of the jars of green beans I've canned this year

I like green beans.  A lot.  If I could plant only one thing in my vegetable garden, it might be green beans (string beans/snap beans).   I like them frozen.  I like them canned.  I like to eat them, Sam-I-Am.

This year I planted 10 varieties, and a lot of them.  As you can imagine, I've got green beans coming out my ears!  Some years I have problems with bean beetles, but thankfully they've not been a problem this year.  I'm making plans for next year, saving seed and deciding which beans are worth saving and which are not.

Beans worth saving and planting a ton of  next year:  HELDA.  This is the first year I've grown Helda pole beans.  Someone on my organic gardening list mentioned them and they sounded intriguing, so at the last minute I ordered some from Territorial Seeds.  I have nothing bad to say about these beans.  As I mentioned, they're pole beans and quite vigorous growers.  They produce huge pods that don't fill out and get "beany" until late...I really don't like green beans that have big old seeds in them; I'm a pod person.   It's not unusual to get 10 inch beans that are STRINGLESS and tender.  Yes, stringless!  They're a Romano type bean.  Positively lovely!  

 One HELDA pole bean, 10 inches long, not at all unusual!

 
 HELDA pole bean

Next year I'm going to create an arbor where the beans can grow up and over so that the ripening beans will hang down for ease of picking.  I can see it now....a shady tunnel walk with massive beans within easy reach.  Sigh.  And these beans produce and produce and produce!  One tepee of beans this year has produced an amazing amount of beans for me.


HELDA pole beans are prolific producers!  I planted one tepee of them around a compost bin--here is a "nest" of beans waiting to be picked

SEQUOIA.  I've been growing these beans for quite a few years.  They're a purple-podded bush bean of the Romano type.  Again, stringless.  I honestly don't have the time to fiddle around with stringy beans, so if they're not stringless they don't get planted here again.  I love purple podded beans, which, by the way, turn green once cooked.  They're easy to pick because they stand out from the green foliage, and I'm sure they must have more antioxidants that their green counterparts.  And they're just so cool looking!  Sequoias have a good flavor and don't get overly beany until they get old.

I'm also growing GIANT STRINGLESS , a bush bean, green, and as their name suggests, stringless.  PROVIDER is another that I'll be saving seed for to plant again next year: bush, green, stringless.

Saving bean seeds is a snap.  Simply let the bean grow out and dry on the plant.  Shell the seeds from the pod, let dry a bit further and store in an airtight container in a cool, dark place, then plant next year and repeat.

Saturday, September 3, 2011

"The Kitchen Is Full of Grape-y Goodness"

Concord grapes ready to be made into wine!

So, I finally got around to picking the Concord grapes.  I should have picked them last week, but I was just too busy/tired.  Rain is predicted for later in the day, and I simply had to get out there and pick grapes!  I have a newly-planted vineyard of 10 vines (mostly Concord and Niagara), but they're too young to produce just yet.  The grapes that I picked today were from one vine that I healed in about 18 years ago when I'd got the vine but didn't know quite where I wanted to plant it.  I stuck it in the ground and never did figure out where to put it, and there it's stayed all these years.  It's currently climbing up into an apple tree and has wild blackberries growing all around and through it.

Grapes climbing up and into an apple tree

 Needless to say, the grapes are a major pain, literally, to pick.  The constant jabbing of the blackberry thorns is a grim reminder that when I buy something, I really need to know where I'm going to plant it!

The grape vine, apple tree and blackberries create quite a jungle, and apparently birds have found it to be a safe and secure place to raise their families.  It does seem impermeable to predators of all sorts!  I had a very difficult time getting that close to this nest:


Bird's nest and wormy apple!

So, grapes are picked, a 5-gallon bucket of wine is in the works, and I made about a gallon of Concord liqueur with the remaining grapes.  Now, we wait....